What have you learned already:
- you have created two ML algorithms in Jupyter notebook,
- you have created Django app with database models and REST API,
- you have added the ML code to the server code and created a ML registry.
What you will learn in this chapter:
- you will add a view for handling requests in the server and forwarding them to ML code,
- you will add API URL to the view,
- you will write tests for predictions.
Predictions view
Firstly, we will create the view for predictions that can accept POST requests with JSON data and forward it to the correct ML algorithm.
In backend/server/apps/endpoints/views.py we need to add the following code:
# please add imports
import json
from numpy.random import rand
from rest_framework import views, status
from rest_framework.response import Response
from apps.ml.registry import MLRegistry
from server.wsgi import registry

'''
... the rest of the backend/server/apps/endpoints/views.py file ...
'''

class PredictView(views.APIView):
    def post(self, request, endpoint_name, format=None):

        algorithm_status = self.request.query_params.get("status", "production")
        algorithm_version = self.request.query_params.get("version")

        algs = MLAlgorithm.objects.filter(parent_endpoint__name = endpoint_name, status__status = algorithm_status, status__active=True)

        if algorithm_version is not None:
            algs = algs.filter(version = algorithm_version)

        if len(algs) == 0:
            return Response(
                {"status": "Error", "message": "ML algorithm is not available"},
                status=status.HTTP_400_BAD_REQUEST,
            )
        if len(algs) != 1 and algorithm_status != "ab_testing":
            return Response(
                {"status": "Error", "message": "ML algorithm selection is ambiguous. Please specify algorithm version."},
                status=status.HTTP_400_BAD_REQUEST,
            )
        alg_index = 0
        if algorithm_status == "ab_testing":
            alg_index = 0 if rand() < 0.5 else 1

        algorithm_object = registry.endpoints[algs[alg_index].id]
        prediction = algorithm_object.compute_prediction(request.data)


        label = prediction["label"] if "label" in prediction else "error"
        ml_request = MLRequest(
            input_data=json.dumps(request.data),
            full_response=prediction,
            response=label,
            feedback="",
            parent_mlalgorithm=algs[alg_index],
        )
        ml_request.save()

        prediction["request_id"] = ml_request.id

        return Response(prediction)
Let’s add the URL for predictions. The file backend/server/apps/endpoints/urls.py should look like below:
# file backend/server/apps/endpoints/urls.py

from django.conf.urls import url, include
from rest_framework.routers import DefaultRouter

from apps.endpoints.views import EndpointViewSet
from apps.endpoints.views import MLAlgorithmViewSet
from apps.endpoints.views import MLRequestViewSet
from apps.endpoints.views import PredictView # import PredictView

router = DefaultRouter(trailing_slash=False)
router.register(r"endpoints", EndpointViewSet, basename="endpoints")
router.register(r"mlalgorithms", MLAlgorithmViewSet, basename="mlalgorithms")
router.register(r"mlrequests", MLRequestViewSet, basename="mlrequests")

urlpatterns = [
    url(r"^api/v1/", include(router.urls)),
    # add predict url
    url(
        r"^api/v1/(?P<endpoint_name>.+)/predict$", PredictView.as_view(), name="predict"
    ),
]
OK, let’s go into details. The PredictView accepts only POST requests. It is available at:
The `endpoint_name` is defining the endpoint that we are trying to reach. In our case (in local development) the ML algorithm can be accessed at:

```http://127.0.0.1:8000/api/v1/income_classifier/predict```

The `income_classifier` is the endpoint name (you can check endpoints at `http://127.0.0.1:8000/api/v1/endpoints`).

What is more, you can specify algorithm status or version in the URL. To specify status and version you need to include them in the URL, for example:

```http://127.0.0.1:8000/api/v1/income_classifier/predict?status=testing&version=1.1.1```.

By default, there is a used `production` status.

Based on endpoint name, status and version there is routing of the request to correct ML algorithm. If the algorithm is selected properly, the JSON request is forwarded to the algorithm object and prediction is computed.

In the code there is also included code that is drawing algorithm in case A/B testing, we will go into details of this code in the next chapter.

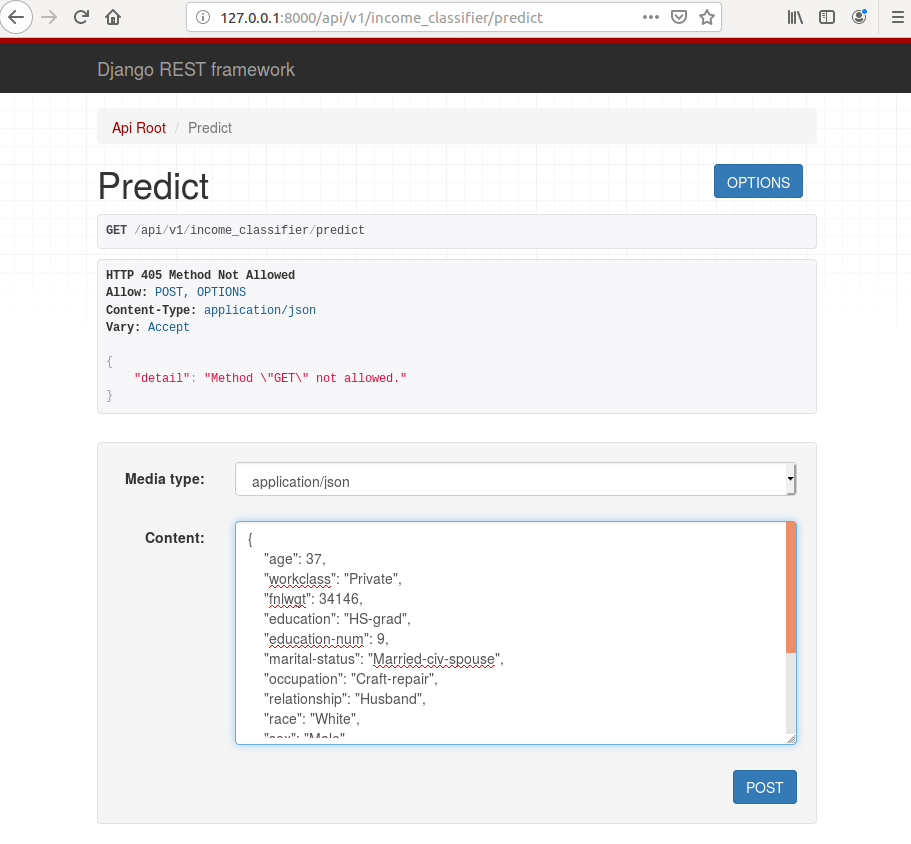
To check if is it working please go to `http://127.0.0.1:8000/api/v1/income_classifier/predict` and provide example JSON input:

```python
{
    "age": 37,
    "workclass": "Private",
    "fnlwgt": 34146,
    "education": "HS-grad",
    "education-num": 9,
    "marital-status": "Married-civ-spouse",
    "occupation": "Craft-repair",
    "relationship": "Husband",
    "race": "White",
    "sex": "Male",
    "capital-gain": 0,
    "capital-loss": 0,
    "hours-per-week": 68,
    "native-country": "United-States"
}
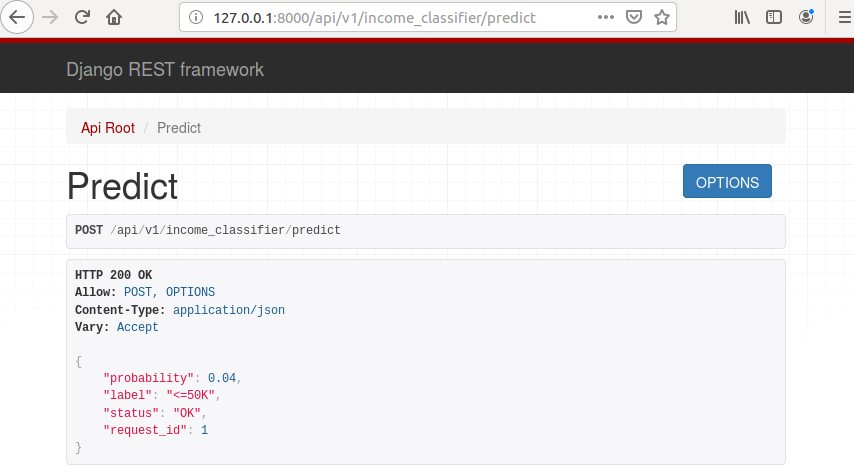
and click the POST button. You should see views like in images below.


Congratulations!!! If you see the result as on image above it means that your ML web service is working correctly.
Your response should look like this:
{
    "probability": 0.04,
    "label": "<=50K",
    "status": "OK",
    "request_id": 1
}
The response contains probability, label, status and request_id. The request_id can be used later to provide feedback and ML algorithms monitoring.
Add tests for PredictView
We will add a simple test case that will check if the predicted view correctly responds to correct data.
# file backend/server/endpoints/tests.py
from django.test import TestCase
from rest_framework.test import APIClient

class EndpointTests(TestCase):

    def test_predict_view(self):
        client = APIClient()
        input_data = {
            "age": 37,
            "workclass": "Private",
            "fnlwgt": 34146,
            "education": "HS-grad",
            "education-num": 9,
            "marital-status": "Married-civ-spouse",
            "occupation": "Craft-repair",
            "relationship": "Husband",
            "race": "White",
            "sex": "Male",
            "capital-gain": 0,
            "capital-loss": 0,
            "hours-per-week": 68,
            "native-country": "United-States"
        }
        classifier_url = "/api/v1/income_classifier/predict"
        response = client.post(classifier_url, input_data, format='json')
        self.assertEqual(response.status_code, 200)
        self.assertEqual(response.data["label"], "<=50K")
        self.assertTrue("request_id" in response.data)
        self.assertTrue("status" in response.data)
To run this test:
# please run in backend/server directory
python manage.py test apps.endpoints.tests
To run all tests:
# please run in backend/server directory
python manage.py test apps
Later more tests can be added, which will cover situations, where wrong endpoints are selected in the URL or data, is in the wrong format.
Add code to the repository
Before going to next chapter let’s add code to the repository:
git commit -am "add predict view"
git push
In the next chapter, we will work on the A/B testing of ML algorithms.